The file âsvpwm.dspâ contains the assembly code for the subroutines. ..... a brief description of the additional code (put in evidence by bold characters) is given.
a Implementing Space Vector Modulation with the ADMCF32X
ANF32X-17
a
Implementing Space Vector Modulation with the ADMCF32X ANF32X-17
© Analog Devices Inc., January 2000
Page 1 of 22
a Implementing Space Vector Modulation with the ADMCF32X
ANF32X-17
Table of Contents SUMMARY...................................................................................................................... 3 1
CONTINUOUS SPACE VECTOR MODULATION (SVM) ........................................ 3
1.1
Space Vector Modulation - What is it?.........................................................................................................3
1.2
Generation of the PWM switching signals ...................................................................................................4
1.3
Inverter capability and reference voltage definition ...................................................................................8
1.4
Limiting the applied voltage vector.............................................................................................................10
1.5
Determination of the sector .........................................................................................................................11
2
THE SVPWM LIBRARY ROUTINES...................................................................... 12
2.1
Using the SVPWM routines.........................................................................................................................12
2.2
Formats of inputs and outputs.....................................................................................................................13
2.3
Usage of the DSP registers ...........................................................................................................................13
2.4
The program code.........................................................................................................................................14
2.5
Access to the library: the header file...........................................................................................................18
3
SOFTWARE EXAMPLE: TESTING THE CONVERSION ROUTINES................... 18
3.1
The main program: main.dsp......................................................................................................................18
3.2
The main include file: main.h ......................................................................................................................21
3.3
Example output.............................................................................................................................................21
© Analog Devices Inc., January 2000
Page 2 of 22
a Implementing Space Vector Modulation with the ADMCF32X
ANF32X-17
Summary The introduction of space vectors, originally only for the purpose of analysis of three-phase machines, has led to the development of an inherently digital modulation method, in contrast to some mere digital approximations to traditional analogue techniques. This technique is nowadays commonly known as space vector modulation (SVM). This application note gives an extensive introduction to its theory and provides routines that allow for easy implementation of SVM into the user’s control algorithm. They are implemented in a library-like module for immediate and intuitive application.
1 Continuous Space Vector Modulation (SVM) 1.1
Space Vector Modulation - What is it?
An inverter is nowadays commonly used in variable speed AC motor drives to produce a variable, threephase, AC output voltage from a constant DC voltage. Since AC voltage is defined by two characteristics, amplitude and frequency, it is essential to work out a strategy that permits control over both these quantities. Pulse width modulation (PWM) controls the average output voltage over a sufficiently small period, called switching period, by producing pulses of variable duty-cycle. Here, sufficiently small means that the switching period is small compared to the period of the desired output voltage so that the output voltage may be considered equal to the desired. A classical example is the so-called sine-triangular PWM. A high frequency triangular wave, called the carrier wave, is compared to a sinusoidal signal representing the desired output, called the reference wave. Usually, ordinary signal generators produce these signals. Whenever the carrier wave is less than the reference, a comparator produces a high output signal, which turn the upper transistor in one leg of the inverter on and the lower switch off. In the other case the comparator sets the firing signal low, which turns the lower switch on and the upper switch off. The typical waveforms are shown in Figure 1. Reference
Vref
waveforms Vcarrier
t
(fs)-1 Comparator ouput
t Vd/2
VA0
t -Vd/2
Figure 1: Sine-triangular pulse width modulation
© Analog Devices Inc., January 2000
Page 3 of 22
a Implementing Space Vector Modulation with the ADMCF32X
ANF32X-17
It may be shown that the magnitude of the fundamental component varies linearly with the fraction
m triangular =
magnitude referen magnitude carrie
, called the modulation index.
A sinusoidal output voltage may therefore be produced, which is proportional to the desired value and whose magnitude is varied by varying the reference's magnitude. The resultant output voltage, of course, contains all the high frequency switching components. It is also an easy task to vary its frequency by changing the frequency of the reference signal. However, the maximum output voltage amplitude obtainable with this approach is ½Vd as mtriangular may not exceed unity. By applying a rectangular square wave on one inverter leg the fundamental is 4 ⋅ 1 ⋅V = 2 ⋅V . This mode is known as six-step and entails increased harmonic distortion. It follows π 2 π d d that only 78.5% of the inverter's capacity is used with sinusoidal modulation. In addition, a separate modulator has to be used for each of the inverter legs, generating three reference signals forming a balanced three-phase system. The approach to pulse width modulation that is described in this application note is based on the space vector representation of the voltage in the stationary reference frame, which was defined in a previous note1. Given a set of inverter pole voltages (VA0,VB0,VC0), the vector components (Vα , Vβ) in this frame are found by the Forward Clarke transform:
r r r r 2 V = Vα + jV β = (V A0 a 0 + VB 0 a 1 + VC 0 a 2 ) 3
where
j r a=e
2π 3
(1)
It is known that a balanced three-phase set of voltages is represented in the stationary reference frame by a space vector of constant magnitude, equal to the amplitude of the voltages, and rotating with angular speed ω = 2π ⋅ fRe f . As will be seen in the next section, the eight possible states of an inverter are represented as two null-vectors and six active-state vectors forming a hexagon. SVM now approximates the rotating reference vector in each switching cycle by switching between the two nearest active-state vectors and the null-vectors. In order to maintain the effective switching frequency of the power devices at a minimum, the sequence of toggling between these vectors is organised such that only one leg is affected in every step. It may be anticipated that the maximum obtainable output voltage is increased with ordinary SVM up to 90.6% of the inverter capability. It is also a relatively easy task to improve this technique in order to reach full inverter capability.
1.2
Generation of the PWM switching signals
With a three-phase voltage source inverter there are eight possible operating states. For instance, in Figure 2a the upper switch of the inverter's pole A is on, whereas the other legs both have the lower switch turned on. Hence the pole voltages are ( 12 Vd , − 12 Vd , − 12 Vd ) for poles A, B, C respectively. In the following this state is denoted as (1,0,0) and, according to the definition of (1), may be depicted as space
r
r
0
vector V1 = 23 Vd e j . Repeating these considerations for the other states one finds two null-vectors V0 for
r
r
r
state (0,0,0) and V7 for state (1,1,1) and 6 non-null-vectors V1 to V6 shown in Figure 2b:
1
ANF32X-11: Reference Frame Conversions with the ADMCF32X
© Analog Devices Inc., January 2000
Page 4 of 22
a Implementing Space Vector Modulation with the ADMCF32X
ANF32X-17
β V3=(0,1,0)
Vd/2
V2=(1,1,0)
II
III
0
Vd
A
B
C
V4=(0,1,1)
I V ref
V0=(0,0,0)
V7=(1,1,1)
IV
Vd/2
VI
α
V V5=(0,0,1)
a) Figure 2:
V1=(1,0,0)
V6=(1,0,1)
b)
a) Configuration of the switches in the state V1=(1,0,0), the inverter states in the stationary reference frame
b) Representation of
It is easily shown that the six non-null states, in the following called active states, are represented by space vectors π r 2 j ( k −1) 3 Vk = Vd e 3
with ( k=1,...,6 )
(2)
forming a regular hexagon and dividing it into six equal sectors denoted as I, II, III, IV, V, VI in Figure 2b.
r
A mean space vector Vref over a switching period TS can be defined. Assuming that TS is sufficiently
r
small, V ref can be considered approximately constant during this interval, and it is this vector which generates the fundamental behaviour of the machine.
r
The Continuous Space Vector Modulation technique is based on the fact that every vector Vref inside the dashed hexagon can be expressed as a weighted average combination of the two adjacent active space vectors and the null-state vectors 0 and 7. Therefore, in each cycle imposing the desired reference vector may be achieved by switching between these four inverter states. Looking at Figure 2b one finds that,
r
r
r
assuming Vref to be laying in sector k, the adjacent active vectors are Vk and Vk +1 , where k+1 is set to 1 for k=6. In order to obtain optimum harmonic performance and the minimum switching frequency for each of the power devices, the state sequence is arranged such that the transition from one state to the next is performed by switching only one inverter leg. This condition is met if the sequence begins with one zero-state and the inverter poles are toggled until the other null-state is reached. To complete the cycle the sequence is reversed, ending with the first zero-state. If, for instance, the reference vector sits in sector 1, the state sequence has to be ...0127210... whereas in sector 4 it is ...0547450... The central part of the space vector modulation strategy is the computation of both the active and zero-state times for each modulation cycle. These may be calculated by equating the applied average voltage to the desired value.
© Analog Devices Inc., January 2000
Page 5 of 22
a Implementing Space Vector Modulation with the ADMCF32X
ANF32X-17
r
In the following, Tk denotes half the on-time of vector Vk . T0 is half the null-state time. Hence, the ontimes are evaluated by the following equations: TS 2
T0
0
0
T0
T0
+Tk +Tk +Tk +1 2 r 2 2 r r r V dt = V dt + V dt + V 0 ref k ∫ ∫ ∫ ∫ k +1 dt + T0 2
T0 2
+Tk
TS 2
T0 2
r V ∫ 7 dt
(3)
+Tk +Tk +1
T (4) T0 + Tk + Tk +1 = S 2 r r r r r r Taking into account that V0 = V7 ≡ 0 and that VRe f is assumed constant and the fact that Vk , Vk +1 are constant vectors, equation (3) reduces to
r r r T VRe f ⋅ S = Vk ⋅ Tk + Vk +1 ⋅ Tk +1 2
(5)
Splitting this vectorial equation into its real and imaginary components, from (2) follows that:
Vα V β
(k − 1)π cos TS 2 3 = Vd Tk 2 3 (k − 1)π sin 3
kπ cos 3 + T 1 k+ kπ sin 3
(k − 1)π cos 3 = 2V d ( 1)π k − 3 sin 3
kπ 3 Tk kπ Tk +1 sin 3
cos
(6)
where k is to be determined from the argument of the reference vector
Vα α = arg Vβ Vα (k − 1)π ≤ arg 3 Vβ
such that
(7)
kπ ≤ 3 .
(8)
The request of minimal number of commutations per cycle is met if in every odd sector the r r r r r r r sequence of applied vectors is V0 Vk Vk +1 V7 Vk +1 Vk V0 , whereas in even sector the active vectors r r r r r r r are applied in the reversed order, hence V0 Vk +1 Vk V7 Vk Vk +1 V0 . Solving system (6), one finds:
Tk 3 TS = Tk +1 2 Vd
kπ sin 3 ⋅ (k − 1)π − sin 3
kπ 3 ⋅ Vα (k − 1)π Vβ cos 3 − cos
(9)
The total null-state time T0 may be divided in an arbitrary fashion between the two zero states. A common solution is to divide T0 equally between the two null-state vectors V 0 and V 7 . From (4), T0 results as
T0 =
TS − (Tk + Tk +1 ) 2
(10)
As an example for the switching scheme, in sector 1 one finds:
© Analog Devices Inc., January 2000
Page 6 of 22
a Implementing Space Vector Modulation with the ADMCF32X
ANF32X-17
PWMa
1 0 1
PWMb
0 1
PWMc
0
T0/2
Tk
Tk+1
0
T0/2
T0/2
Tk+1
Tk
T0/2
TS/2
TS
Figure 3: PWM output signals for a particular case with the reference vector sitting in sector I Assuming that is desired to produce a balanced system of sinusoidal phase voltages, it is known that the
r
r
r
corresponding space vector locus is circular. Imposing VRe f = VRe f e jωt = VRe f ⋅ (cos(ωt ) + j sin (ωt )) ,
r
where V Re f
is the magnitude and ω is the angular frequency of the desired phase voltages, it follows
from (9) that
kπ sin 3 Tk 3 V ref = ⋅ TS ⋅ (k − 1)π Tk +1 2 Vd − sin 3
kπ 3 ⋅ cos ωt (k − 1)π sin ωt cos 3 − cos
(11)
While 0 ≤ ωt ≤ π 3 the reference vector lies in sectors 1 and equation (11) reduces to
r π V T 1 3 Re f sin( − ωt ) = TS 3 sin ωt T2 2 V d
(12)
The mean values of the inverter pole voltages averaged over one switching cycle are thus
V A0 (ωt ) =
Vd 2TS
(−
T0 2
T0 2
+ T1 + T2 + T0 + T2 + T1 − ) =
VB 0 (ωt ) = 2VTdS (− T20 − T1 + T2 + T0 + T2 − T1 − T20 ) = VC 0 (ωt ) = − V A0 (ωt )
r 3 VRe f 2 V r d 3 VRe f 2 Vd
Vd cos(ωt − π6 )
Vd sin(ωt − π6 )
(13)
Analogous, solving equation (11) for the other sector one finds
© Analog Devices Inc., January 2000
Page 7 of 22
a Implementing Space Vector Modulation with the ADMCF32X
V A0 (ωt ) = = = = = =
r VRe f cos(ωt − π6 ) r 3 2 VRe f cos ωt r 3 π 2 VRe f cos(ωt + 6 ) r 3 π 2 VRe f cos(ωt − 6 ) r 3 2 VRe f cos ωt r 3 π V Re f cos(ωt + 6 ) 2 3 2
ANF32X-17
0 ≤ ωt ≤ π3 π 3
≤ ωt ≤
2π 3
2π 3
≤ ωt ≤ π
π ≤ ωt ≤
4π 3
4π 3
≤ ωt ≤
5π 3
≤ ωt ≤ 2π
(14)
5π 3
VB 0 (ωt ) = V A0 (ωt − 23π ) VC 0 (ωt ) = V A0 (ωt − 43π ) V A0 (ωt ) is shown in Figure 4.
vA0
π
2π
π _ 3
ωt
Sector1 Sector 2 Sector 3 Sector 4 Sector 5 Sector 6 Figure 4: Pole voltage for the ideal SV-modulation Evaluating the line-to-line voltages from (14) leads to
r V AB (ωt ) = V A0 (ωt ) − VB 0 (ωt ) = 3 VRe f sin(ωt + π3 ) for 0 ≤ ωt ≤ 2π VBC (ωt ) = V AB (ωt − 23π ) 4π VCA (ωt ) = V AB (ωt − 3 )
(15)
Therefore it turns out that they are sinusoidal, as expected.
1.3
Inverter capability and reference voltage definition
The hexagon of Figure 2b represents the range of realisable voltage space vectors. Using the space vector modulation process it is possible to realise any arbitrary voltage space vector that lies within this hexagon. The maximum fundamental phase voltage that may be produced by the inverter for a given dc link voltage occurs under six-step operation. The resultant phase voltage developed by the inverter is shown © Analog Devices Inc., January 2000
Page 8 of 22
a Implementing Space Vector Modulation with the ADMCF32X
ANF32X-17
in Figure 5, where the six different voltage levels, corresponding to operation at each of the active inverter states, are clearly seen.
V
AN
Vmaxsixstep π 3
4π 3
π
2π 3
5π 3
2V d 3
ωt 2π
Figure 5: Resultant inverter phase voltage and corresponding fundamental component for six-step operation. The fundamental component of the six-step voltage waveform is also illustrated in Figure 5. From the Fourier analysis, the fundamental voltage magnitude is given by:
Vmax sixstep =
4 Vd . π 2
(16)
This voltage level is achieved only at the expense of significant low frequency distortion. It was already mentioned that for conventional sinusoidal modulation the maximum achievable fundamental voltage is:
Vmax sin pwm =
Vd 2
(17)
so that only 78.5% of the available inverter capacity is used. If the space vector modulator is required to produce a balanced three-phase system of voltages of magnitude Vref and frequency ω, given by:
V AN = Vref cos(ω t )
VBN = Vref cos(ω t − 23π )
VCN = Vref cos(ω t − 43π )
(18)
the corresponding reference voltage space vector is given by:
V ref = Vref [cos (ωt ) + j sin(ωt )] = Vref e jωt
(19)
It is found useful to define the modulation index as the ratio of the desired peak fundamental magnitude to the maximal fundamental output in six-step mode:
m=
© Analog Devices Inc., January 2000
r Vref Vmax sixstep
=
π Vref ⋅ 2 Vd
(20)
Page 9 of 22
a Implementing Space Vector Modulation with the ADMCF32X
ANF32X-17
Therefore, the reference space vector describes a circular trajectory of radius Vref at an angular velocity ω in the complex plane. Clearly, the largest possible voltage magnitude that may be achieved using the space vector modulation strategy corresponds to the radius of the largest circle that can be inscribed within the hexagon of Figure 2b. This circle is tangential to the midpoints of the lines connecting the ends of the active state vectors. The maximum fundamental phase voltage that may be achieved is:
r VRe f
max
= 23 Vd
=
3 2
1 3
Vd
(21)
Following the definition of modulation index introduced in above, the corresponding maximum modulation index is given by
mmax cont =
r VRe f
max
Vmax sixstep
=
1 2
3
π
⋅ Vd
=
⋅ Vd
π = 0.906 2 3
(22)
As seen, the maximum peak fundamental magnitude that may be obtained with the SVM technique is about 90.6 % of the inverter capacity. This represents a 15% increase in the maximum voltage compared with conventional sinusoidal modulation. The maximum output line voltage magnitude is, from equation (15):
r VˆAB max = 3 VRe f
max
= Vd
(23)
With the definition of modulation index the computation of the inverter switching times does not require the knowledge of the adopted DC-link voltage but depends only on the desired modulation index. This
r
may be seen observing that VRe f = m ⋅ Vmax sixstep = m ⋅ 2 π ⋅ Vd and substituting this equation in (11), leading to:
kπ sin 3 Tk 3 = m ⋅ TS ⋅ (k − 1)π π Tk +1 − sin 3
kπ 3 ⋅ cos ωt (k − 1)π sin ωt cos 3 − cos
(24)
It is possible to increase this modulation index up to operation in six-step mode (m=1) by operating in discontinuous SVM introducing additional distortion of the line currents. This is achieved by directly modifying the magnitude and/or angle of the reference vector. This issue is not treated in this application note. However, the adopted scaling choice of m leaves the options to the user of easily extending the inverter’s range of operation to full modulation.
1.4
Limiting the applied voltage vector
In the previous section it was found that the maximum modulation index obtainable with continuous space vector modulation is mmax cont = 0.906 . At this point the reference vector describes the maximum circular trajectory which may be inscribed within the hexagon. The circle and the hexagon are tangential at exactly one position for each sector, at α = π 6 + (k − 1) π 3 , where k is the sector's number. However, even at this point relatively large areas within the hexagon remain unused. These areas are largest in the region of the active-state vectors, and represent unused inverter capacity. As the reference vector's magnitude increases further, the locus passes outside the hexagon in the neighbourhood of these points, whereas it still lies inside it in the zones near the active switching states. Thus, the possibility of a higher modulation index is still available in these regions, i.e. during periodic time intervals of limited duration.
© Analog Devices Inc., January 2000
Page 10 of 22
a Implementing Space Vector Modulation with the ADMCF32X
ANF32X-17
When the desired trajectory passes outside the hexagon, the time average equations (10) give negative (and therefore meaningless) values for the on-duration T0 of the zero-state vectors. It is possible to overcome this problem by simply 'rescaling' the active state times Tk and Tk+1 to:
TS Tk 2 Tk + Tk +1 T Tk +1 T 'k +1 = S 2 Tk + Tk +1 T 'k =
(25)
so that T ' k +T ' k +1 = 12 TS and T0=0 . It is clear from (5) that the magnitude of the produced vector is reduced by the same factor.
r r r r TS TS 2 r 2 r V ' Re f = Vk ⋅ T 'k +Vk +1 ⋅ T ' k +1 = Vk ⋅ Tk + Vk +1 ⋅ Tk +1 ⋅ = ⋅VRe f 2(Tk + Tk +1 ) 2(Tk + Tk +1 ) TS TS
(
)
(
)
(26)
The effective locus now follows the hexagon line causing a reduction in the output fundamental voltage. This may be shown, for instance, in sector I by observing that:
rT r r V S = V1 ⋅ T1 '+V2 ⋅ T2 ' 2
(27)
Hence, from equation (12):
r 2 TS V = ⋅ TS 2
r ⋅ V1
π sin ( −α ) 3 π sin ( −α ) + sin α 3
r + V2
= π sin ( −α ) + sin α 3 sin α
1 π 2 = Vd ⋅ 1π ⋅ sin( − α ) + sin ( +α ) 3 3 0 3 =
Vd 3
⋅
1
π sin ( +α ) 3
( )
1
2 3 2
2 1 sin α = Vd ⋅ π ⋅ sin ( +α ) 3 3
3 3
cosα = sinα 2
2
(28)
α ⋅ cos sinα
This is the Cartesian representation of a vector with magnitude
r V V = d ⋅ 1π 3 sin ( 3 +α )
(29)
and argument α and it is easy to show that it describes the first segment of the hexagon for α varying between 0 and π 3 .
Although the rescaling of the on-state times solves the problem of the obtained meaningless switching instants, it also causes a reduction of the output voltage with respect to the desired value. 1.5
Determination of the sector
Given an arbitrary reference vector Vα + jV β , the phase angle can be evaluated by
Vβ Θ = arctan Vα © Analog Devices Inc., January 2000
,
Θ ∈ [0,2π ]
(30)
Page 11 of 22
a Implementing Space Vector Modulation with the ADMCF32X
ANF32X-17
However, this approach involves two time-intensive operations arctan(x) and the division and, in addition, imposes the condition on Vα to be not equal to zero. These difficulties may be overcome by observing that each quadrant is shared by two sectors. The quadrant in which the reference vector sits is easily determined by examining the sign of its real and imaginary components. Having determined the quadrant, for instance 1, the vector lies in sector I if
Vβ arctan Vα
π ≤ 3
(31)
π Vβ ≤ Vα tan = 3 ⋅ Vα , 3
hence
(32)
otherwise the vector lies in sector II. In our case this condition reduces to sin ωt ≤ 3 ⋅ cos ωt . This method needs only a multiplication and a few comparisons. Analogous, in quadrant 2 (with Vα < 0,Vβ > 0 ) one finds:
sector III if
Vβ arctan − Vα
or
Vβ ≤ 3 ⋅ (−Vα )
π ≤ 3 ; sector II otherwise.
Similar considerations apply to quadrant 3 and 4.
2 The SVPWM Library Routines 2.1
Using the SVPWM routines
The routines are developed as an easy-to-use library, which has to be linked to the user’s application. The library consists of two files. The file “svpwm.dsp” contains the assembly code for the subroutines. This package has to be compiled and can then be linked to an application. The user simply has to include the header file “svpwm.h”, which provides function-like calls to the routines. The example file in Section 3 will demonstrate the usage of all the conversion routines. The following table summarises the set of macros defined in this library. Operation
Usage
Calculate On-times
SVM_Calc_Ontimes (Vαβ, OnTime_vector);
Calculate Duty-cycles
SVM_Calc_Dutycycles (OnTime_vector, Dutycycles_vector);
Update PWM Block
SVM_Update_Dutycycles (Dutycycles_vector); Table 1 Implemented routines
The input vector Vαβ consists of two elements holding the components of the stator quantity vector. In the case of a necessity to re-scale the on-times, this vector will become also an output, since the routine will reflect the reduction of it’s magnitude. The OnTime_vector contains the current sector and the on-times of both the active vectors and zero-state vectors after a call to SVM_Calc_Ontimes. Finally, the Dutycycles_vector holds the duty-cycles for each phase after a call to SVM_Calc_Dutycycles. They may
© Analog Devices Inc., January 2000
Page 12 of 22
a Implementing Space Vector Modulation with the ADMCF32X
ANF32X-17
be loaded into the PWM block by a call to SVM_Update_Dutycycles. The format of inputs and outputs are explained in more detail in the next section. The reason for splitting the SV modulation process into three separate subroutines is to maintain the maximum of flexibility. Having access to the on-times and duty-cycles leaves the options of compensating for switching dead-times, inverter on-state voltages and/or DC-link voltage ripple in an optimal fashion. The routines do not require any configuration constants from the main include-file “main.h” that comes with every application note. For more information about the general structure of the application notes and including libraries into user applications refer to the Library Documentation File. Section 3 shows an example of usage of this library. In the following sections each routine is explained in detail with the relevant segments of code which is found in either “svpwm.h” or “svpwm.dsp”. For more information see the comments in those files.
2.2
Formats of inputs and outputs
As already mentioned, the SVM module expects the input to be a vector in the stationary reference frame
V ref = Vα + jV β . Since all quantities in the DSP core are scaled in the 1.15 fixed-point format, is becomes natural to normalise the reference vector to be represented in this format. 2 α
If
2 β
Vref = V ref = V + V denotes the magnitude of the reference vector, it is clear that scaling the reference as in (20) leads to a reference vector with magnitude equal to the modulation index and comprised in the range from zero to one (90.6% for continuous SVM). In conclusion, if the input vector is of constant magnitude m and rotates at constant angular speed, the amplitude VˆxN of the produced three-phase system is related to m such that
2 VˆAN , BN ,CN = Vd ⋅ m π
(33)
where m is in the range of 0 (0x0000) to 0.906 (0x7415) for continuous SVM (reference vector inside the hexagon at all times) and 0.906 (0x7416) to 1 (0x7FFF) when trajectories that are partially outside the hexagon are demanded. In the latter case, Vα and Vβ will be replaced by the scaled values after executing SVM_Calc_Ontimes. The output OnTime_vector stores information about the sector (1 to 6) that the reference vector lays in, the on-time of the first vector to be applied (Vk for odd sectors, Vk+1 for even sectors), the on-time of the second vector to be applied (Vk+1 for odd sectors, Vk for even sectors) and finally the total zero state time T0. The output DutyCylces_vector holds the duty cycles value for channel A, B and C respectively. On-times and duty-cycles are expressed as increments of the PWM timer, therefore in the range of 0 to the content of the PWM period register PWMTM.
2.3
Usage of the DSP registers
The macros listed in Table 1 are based on two subroutines, namely SVM_Ontimes_ and SVM_DutyCycles_. They are described in detail in the next section. The following table gives an overview of the usage of the core DSP registers, when the macros are called.
© Analog Devices Inc., January 2000
Page 13 of 22
a Implementing Space Vector Modulation with the ADMCF32X Input 2 and
Subroutine
modified DAG registers
Output 3
ANF32X-17 Modified core registers
I1 = ^Reference I0 = ^Ontimes I6, I7
SVM_Calc_Ontimes
N/A
ALL except se
M0, M1, M6, M6 = 1
L0, L1, L6, L7 = 0 I1 = ^Ontimes I2 = ^Dutycycles SVM_Calc_DutyCycles
I4
ax0, ay0, ay1, ar, af, N/A
mr1, mr2,
M1, M2 = 1
sr0, sr1
L1, L2 = 0
I1 = ^Dutycycles SVM_Update_DutyCycles
M1 = 1 L1 = 0
PWMCHA, PWMCHB, PWMCHC
ar
Table 2 Usage of DSP core registers for the macros
2.4
The program code
The following code contained in the file “svpwm.dsp” defines the two routines mentioned in the previous section. A vector of sine and cosine values at multiples of 60° is defined which serves for the computation of equation 3 π
(24). The values actually include also the common factor in that equation of
in order to save one
multiplication. As they are stored in Flash Memory, the format is the usual 1.15 format extended to the right with zeros in order to obtain a 24-bit value. {*************************************************************************************** * Local Variables Defined in this Module * ***************************************************************************************} { Look up Table for sqrt(3)/pi*sin((i-1)*pi/3) i= no. of sector .VAR/RAM/PM/CIRC/SEG= USERFLASH1 SineVector[6]; .INIT SineVector: 0x000000, 0x3D1D00, 0x3D1D00, 0x000000, 0xC2E200, 0xC2E200;
}
{ Look up Table for sqrt(3)/pi*cos((i-1)*pi/3) i= no. of sector .VAR/RAM/PM/CIRC/SEG= USERFLASH1 CosineVector[6]; .INIT CosineVector: 0x469100, 0x234800, 0xDCB700, 0xB96E00, 0xDCB700, 0x234800;
}
2
^vector stands for ‘address of vector’
3
N/A: The output values are stored in the output vector in Data Memory. No DSP core register is used.
© Analog Devices Inc., January 2000
Page 14 of 22
a Implementing Space Vector Modulation with the ADMCF32X
ANF32X-17
The first task of the SVM routine is to determine the current sector, which the reference vector lays in. The following piece of code achieves this through the algorithm presented in section 1.5. After executing this piece, ax0 contains the number of the sector (0x0001 to 0x0006). SVPWM_Ontimes_: ax1= DM(I0,M0); ay1= DM(I0,M0); my0=One_Over_Sqrt3; ar = pass ay1; if lt jump Sector456; af=pass ax1, ar = ax1; if lt jump Sector32; mx0=ay1; mr=mx0*my0 (rnd); none=mr1 -af; if gt jump Sector2; Sector1:
Sector32: af=abs ar; if AV af=af-1; mx0=ay1; mr=mx0*my0 (rnd); none=mr1 - af; if gt jump Sector2; Sector3:
Sector2:
ax0= 1; jump Solve_equation;
ax0= 3; jump Solve_equation; ax0= 2; jump Solve_equation;
Sector456: af=pass ax1, ar = ax1; if lt jump Sector45; ar = pass ay1; ar=abs ar; if AV ar=ar-1; mr=ar*my0 (rnd); af= pass ax1; none=mr1-af; if gt jump Sector5; Sector6:
ax0= 6; jump Solve_equation;
Sector45: ar=abs ar; if AV ar=ar-1; af=pass ar; ar = pass ay1; ar=abs ar; if AV ar=ar-1; mr=ar*my0 (rnd); none=mr1-af; if gt jump Sector5; Sector4:
Sector5:
ax0= 4; jump Solve_equation; ax0= 5; jump Solve_equation;
Next, equation (24) is effectively computed. The core is a sequence of MAC operations, which implement the matrix multiplication. The comments show what values are calculated. Then the values are multiplied by the PWM period. However, since the PWMTM register is represents half of the PWM period, the obtained value has to be multiplied by two (shifted to the left). Note that it is not possible to incorporate the factor 2 into the vectors of constant since some of them would be greater than one. Also, depending on whether the sector is
© Analog Devices Inc., January 2000
Page 15 of 22
a Implementing Space Vector Modulation with the ADMCF32X
ANF32X-17
even or odd, the values for Ta and Tb are organised into sr such that the lower word contains the on-time for the first vector to be applied and the higher word the on-time for the second vector. Solve_equation: DM(I1,M1)=ax0;
{ store no. of sector
}
{Ts/2
}
my0 = PM(I7,M7); mr = mx1 * my0 (SS), my0 = PM(I6,M6); mr = mr - mx0*my0 (rnd);
{cos k-1 {sin k-1
} }
mr = mr1 * my1 (SS), si = mr1;
{sin k { Tb/2 for odd sectors
} }
mr = mx0 * my0 (SS), my0 = PM(I7,M7); mr = mr - mx1*my0 (rnd);
{cos k
}
mr = mr1 * my1 (SS);
{ Ta/2 for odd sectors
}
{ Tb for even sectors { Ta for even sectors
} }
ay0= ar = I6 = M6 = L6 =
^SineVector - 1; ax0 + ay0; ar; 1; %SineVector;
ay0= ar = I7 = M7 = L7 =
^CosineVector - 1; ax0 + ay0; ar; 1; %CosineVector;
mx0 = ax1; mx1 = ay1; my1 = DM(PWMTM);
my0 = PM(I6,M6);
astat = ax0; if EQ jump Sector_odd; Sector_even: sr = ASHIFT mr1 by 1 (HI); sr = sr or ASHIFT si BY 1 (LO); jump SVM_saturate; Sector_odd: sr = ASHIFT si by 1 (HI); sr = sr or ASHIFT mr1 BY 1 (LO);
{ Tb for odd sectors { Ta for odd sectors
} }
At last, the computation of the zero-state time is executed. Clearly, if this value is negative, the demanded vector lays outside the hexagon and needs to be re-scaled, as explained in section 1.4. In that case, a division is necessary (code labelled by saturation). Since the on-times are positive numbers and Ta+Tb is greater that Ts/2, a very simple division routine is implemented. The last instruction just copies the obtained values into the output vector. SVM_saturate: ay0 = sr0; ar = sr1 + ay0; ay0= ar; ar = DM(PWMTM); af = pass ar; ar = ar - ay0; if GE jump NO_saturation; saturation: ax0 = ay0; ay0 = 0; ASTAT = 0; divq ax0; divq ax0; divq divq ax0; divq divq ax0; divq divq ax0; divq divq ax0; divq my0 = ay0;
ax0; ax0; ax0; ax0; ax0;
}
{ Ts/2 { store Ts/2 into af for eventual division { T0
} } }
{ do division with MSW of num already in af
}
{ Ts/2 is always < (Ta+Tb) and both are positive} { unsigned division } divq ax0; divq ax0; divq ax0; divq ax0; divq ax0; { Ts/2/(Ta+Tb) }
mr = sr0 * my0 (SS);
© Analog Devices Inc., January 2000
{ Ta + Tb
{ Ta scaled
}
Page 16 of 22
a Implementing Space Vector Modulation with the ADMCF32X sr0 = mr1; mr = sr1 * my0 (SS); sr1 = mr1; ar = pass 0; mr = mx0 * my0 (SS); DM(I0,M0) = mr1; mr = mx1 * my0 (SS); DM(I0,M0) = mr1; NO_saturation: DM(I1,M1) = sr0; DM(I1,M1) = sr1; DM(I1,M1) = ar;
ANF32X-17
{ Tb scaled
}
{ T0
}
{ Valpha scaled
}
{ Vbeta scaled
}
{ first ontime { second ontime { T0
} } }
rts;
The routines for calculating the duty-cycles is really only a jump-table which assigns the right values to channels A, B and C, depending on the current sector. The duty-cycles are calculated from the on-times and denoted as small, middle and big duty-cycle. Then, depending on the sector, these values are related to the correct channel and copied into the output vector. SVPWM_DutyCycles_: ax0= DM(I1,M1); ar = ax0 - 1; sr = ASHIFT ar by 2 (LO); af = pass sr0; ay0= ay1= sr0= sr = ar = sr1= ar = mr1=
DM(I1,M1); DM(I1,M1); DM(I1,M1); ASHIFT sr0 by -1 (LO); sr0 + ay1; ar; ar + ay0; ar;
{ sector
}
{ af = 4*(sector-1)
}
{ { { { {
} } } } }
1st Ontime 2nd Ontime Zero time Zero time /2 middle duty cycle
{ big duty cycle
}
ar = ^Jump_table; ar = ar + af; I4 = ar; jump(I4); Jump_table: Sec1: DM(I2,M2) DM(I2,M2) = sr1; DM(I2,M2) = sr0; rts; Sec2: DM(I2,M2) DM(I2,M2) = mr1; DM(I2,M2) = sr0; rts; Sec3: DM(I2,M2) DM(I2,M2) = mr1; DM(I2,M2) = sr1; rts; Sec4: DM(I2,M2) DM(I2,M2) = sr1; DM(I2,M2) = mr1; rts; Sec5: DM(I2,M2) DM(I2,M2) = sr0; DM(I2,M2) = mr1; rts; Sec6: DM(I2,M2) DM(I2,M2) = sr0; DM(I2,M2) = sr1; rts;
= mr1;
= sr1;
= sr0;
= sr0;
= sr1;
= mr1;
© Analog Devices Inc., January 2000
Page 17 of 22
a Implementing Space Vector Modulation with the ADMCF32X
2.5
ANF32X-17
Access to the library: the header file
The library may be accessed by including the header file “svpwm.h” in the application code, as was already explained in the section 2.1. The header file is intended to provide function-like calls to the routines presented in the previous section. It defines the calls shown in Table 1. The file is mostly self-explaining. The only comment is that, since the input and output vectors are pointed to by index registers of the DM-DAG, they must be defined in data memory. .MACRO SVPWM_Calc_Ontimes(%0, %1); I0 = ^%0; M0 = 1; L0 = %%0; I1= ^%1; M1 = 1; L1 = 0; call SVPWM_Ontimes_; .ENDMACRO; .MACRO SVPWM_Calc_DutyCycles(%0, %1); I1 = ^%0; M1 = 1; L1 = 0; I2= ^%1; M2 = 1; L2 = 0; call SVPWM_DutyCycles_; .ENDMACRO; .MACRO SVPWM_Update_DutyCycles(%0); I1 = ^%0; M1 = 1; L1 = 0; ar = DM(I1,M1); ar = DM(I1,M1); ar = DM(I1,M1); .ENDMACRO;
DM(PWMCHA) = ar; DM(PWMCHB) = ar; DM(PWMCHC) = ar;
3 Software Example: Testing the Conversion Routines 3.1
The main program: main.dsp
The example demonstrates how to use the routines. Similarly to a previous note4, it generates a balanced three-phase system. The magnitude is stored in a data memory location AD_IN. The (rotating) reference vector is created by applying the forward Park transformation5 to the (constant) vector Vdq=(AD_IN, 0). The angle theta is calculated at each step in a similar fashion as in the mentioned application note. Then the three routines listed in Table 1 are called in sequence. The different outputs are converted and may be displayed on a scope by means of the digital to analog converter in the usual manner. This section will only explain the few and intuitive modifications to those applications. The file “main.dsp” contains the initialisation and PWM Sync and Trip interrupt service routines. To activate, build the executable file using the attached build.bat either within your DOS prompt or clicking on it from Windows Explorer. This will create the object files and the main.exe example file. This file 4
ANF32X-03: Generation of Three-Phase Sine-Wave PWM
5
ANF32X-11: Reference Frame Conversions with the ADMCF32X
© Analog Devices Inc., January 2000
Page 18 of 22
a Implementing Space Vector Modulation with the ADMCF32X
ANF32X-17
may be run on the Motion Control Debugger. The main program is for debugging placed in Program RAM. When the program is ready for standalone operation (from Flash) the start location is moved from ABS=0x30 to ABS=0X2200. (See Reference Manual). Every module besides from the Main_program module is by default placed in either one of the three USERFLASH memory banks. In the following, a brief description of the additional code (put in evidence by bold characters) is given. Start of code – declaring start location in program memory or FLASH memory. . Comments are placed depending on whether the program should run in PMRAM or Flash memory. {************************************************************************************** * Application: Starting from FLASH (out-comment the one not used) **************************************************************************************} !.MODULE/RAM/SEG=USERFLASH1/ABS=0x2200
Main_Program;
{************************************************************************************** * Application: Starting from RAM (out-comment the one not used) **************************************************************************************} .MODULE/RAM/SEG=USER_PM1/ABS=0x30 Main_Program;
Next, the general systems constants and PWM configuration constants (main.h – see the next section) are included. Also included are the PWM library, the AUX_DAC interface, the reference conversion library and the space vector modulation module definitions {*************************************************************************************** * Include General System Parameters and Libraries * ***************************************************************************************} #include ; #include #include #include #include
; ; ; ;
#include ;
Variables, Labels and Scope definitions. Here is where all the vectors for the SVM routines are declared. {*************************************************************************************** * Local Variables Defined in this Module * ***************************************************************************************} .VAR/DM/RAM/SEG=USER_DM AD_IN; .VAR/DM/RAM/SEG=USER_DM Theta;
{ Volts/Hertz Command (0-1) { Current angle
} }
.VAR/DM/RAM/SEG=USER_DM Vdq_ref[2]; .VAR/DM/RAM/CIRC/SEG=USER_DM Valphabeta_ref[2];
{ rotor ref.frame { alphabeta frame
} }
{ Voltage demands
}
.VAR/RAM/DM/SEG=USER_DM OnTime_struct[1*4]; .VAR/RAM/DM/SEG=USER_DM Dutycycles_struct[1*3]; .VAR/DM/RAM/SEG=USER_DM VrefA; .VAR/DM/RAM/SEG=USER_DM VrefB; .VAR/DM/RAM/SEG=USER_DM VrefC;
First, the initialisation of the AUXDAC functions is done. After this a check up on the status of the selected PIO-line for FLASH erase. Secondly, the PWM block is set up to generate interrupts every 100µs (see “main.h” in the next Section).Finally the start variables are initialised. The main loop just waits for interrupts.. {**************************************************************************************} { Start of program code } {**************************************************************************************} Startup: Write_AUXDAC_Init; FLASH_erase_PIO(6);
© Analog Devices Inc., January 2000
{ Initialize the use of AUXPWM channels as DAC
}
{ Select PIO6 as clearing PIO { Remember that sport1 is muxed with the PIO-lines
} }
Page 19 of 22
a Implementing Space Vector Modulation with the ADMCF32X
ANF32X-17
{ If the bit is high Clear Memory and Boot from Flash bit } PWM_Init(PWMSYNC_ISR, PWMTRIP_ISR); IFC = 0x80; ay0 = 0x200; ar = IMASK; ar = ar or ay0; IMASK = ar;
{ Clear any pending IRQ2 inter. { unmask irq2 interrupts.
} }
{ IRQ2 ints fully enabled here
}
{**************************************************************************************} { Initialization of parameters } {**************************************************************************************} ar = 0x7415;
dm(AD_IN) = ar;
{ Corresponds to 0.906
}
ar = 0x0000;
dm(Theta) = ar; dm(VrefA) = ar; dm(VrefB) = ar; dm(VrefC) = ar;
dm(OnTime_struct) = ar; dm(OnTime_struct+1) = ar; dm(OnTime_struct+2) = ar; dm(OnTime_struct+3) = ar; dm(Dutycycles_struct) = ar; dm(Dutycycles_struct+1) = ar; dm(Dutycycles_struct+2) = ar; Main: NOP; jump Main;
{ Wait for interrupt to occur }
rts;
The interrupt service routine simply shows how to generate a balanced three-phase system similar to the already cited previous application note. Since the conversion routines make use of the pointer register I1,when using this register one has to be aware of saving the register before returning to new storage. What follows (in bold characters) is the actual generation. First, the current angle Theta is computed by incrementing it by an amount, which is dependent on the demanded frequency AD_IN. This is almost identical as in the application note ANF32X-03, except for the fact that this time only one angle is required. This angle is then used by the forward Park transformation to convert a constant vector in the rotor reference frame of components AD_IN and 0 into a uniformly rotating vector in the stationary reference frame. Note that the default value given in this example is set to the limit of continuous SVM mentioned in section 1.3. This reference vector is the one used in the actual sequence of calls, which calculates on-times and duty-cycles and updates the PWM block. The following lines just update the AUX_DAC channels 1 and two, for the " digital-to-analogue conversion". The default are reference vector Vαβ., see Section 3.3 but any of the signals can be plotted for visualisation. {**************************************************************************************} { PWM Interrupt Service Routine } {**************************************************************************************} PWMSYNC_ISR: ar = DM(AD_IN); mr = 0; mr1 = dm(Theta); my0 = Delta; mr = mr + ar*my0 (SS); dm(Theta) = mr1;
{ Clear mr { Preload Theta
} }
{ Compute new angle & store
}
DM(Vdq_ref )= ar; ar = pass 0; DM(Vdq_ref+1)= ar;
{ Set constant Vdq reference (AD_IN,0)}
refframe_Set_DAG_registers_for_transformations; refframe_Forward_Park_angle(Vdq_ref,Valphabeta_ref,mr1); { generate Vreference in alpha-beta frame SVPWM_Calc_Ontimes(Valphabeta_ref, OnTime_struct); { use SVPWM routines SVPWM_Calc_Dutycycles(OnTime_struct, Dutycycles_struct); SVPWM_Update_DutyCycles(Dutycycles_struct);
© Analog Devices Inc., January 2000
} }
Page 20 of 22
a Implementing Space Vector Modulation with the ADMCF32X
ANF32X-17
{**************************************************************************************} { Write to the AUX_DAC channels } {**************************************************************************************} ! mx0 = 0x8; ! my0 = DM(Dutycycles_struct ); ! mr = mx0 * my0 (SS); ! DM(Plot_1) = mr0; ! Write_AUXPWM(AUXCH0,Plot_1); { Using AUX_DAC to plot Dutycycles_struct } ! ! ! !
my0 = DM(Dutycycles_struct+1); mr = mx0 * my0 (SS); DM(Plot_2) = mr0; Write_AUXPWM(AUXCH1,Plot_2);
{ Using AUX_DAC to plot Dutycycles_struct+1
}
{**************************************************************************************} my0 = DM(Valphabeta_ref ); DM(Plot_1) =my0; Write_AUXPWM(AUXCH0,Plot_1);
{ Stationary ref frame
}
{ Using AUX_DAC to plot Valphabeta_ref
}
my0 = DM(Valphabeta_ref+1); DM(Plot_2) =my0; Write_AUXPWM(AUXCH1,Plot_2);
{ Stationary ref frame
}
{ Using AUX_DAC to plot Valphabeta_ref+1
}
{**************************************************************************************} ! mx0 = 0x800; ! my0 = DM(OnTime_struct ); ! mr = mx0 * my0 (SS); ! DM(Plot_1) =mr0; ! Write_AUXPWM(AUXCH0,Plot_1); { Using AUX_DAC to plot OnTime_struct } {**************************************************************************************} { All other values seen in the applications note can be plottet the same way as { illustrated above.
} }
RTI;
3.2
The main include file: main.h
This file contains the definitions of ADMCF32X constants, general-purpose macros and the configuration parameters of the system and library routines. It should be included in every application. For more information refer to the Library Documentation File. This file is mostly self-explaining. As already mentioned, the SVPWM library does not require any configuration parameters. The following defines the parameters for the PWM ISR used in this example. {**************************************************************************************} { Library: PWM block } { file : PWMF32X.dsp } { Application Note: Usage of the ADMCF32X Pulse Width Modulation Block } .CONST PWM_freq = 10000; {Desired PWM switching frequency [Hz] } .CONST PWM_deadtime = 1000; {Desired deadtime [nsec] } .CONST PWM_minpulse = 1000; {Desired minimal pulse time [nsec] } .CONST PWM_syncpulse = 1540; {Desired sync pulse time [nsec] } {**************************************************************************************}
3.3
Example output
The signals that are generated by this demonstration program are shown in the following figures. Assume the desired modulation index be equal to the upper limit of continuous SVM, i.e. m=0.906 (0x7415). Therefore the reference vector in the rotor frame is:
© Analog Devices Inc., January 2000
Page 21 of 22
a Implementing Space Vector Modulation with the ADMCF32X
ANF32X-17
Vd 1 V = m ⋅ 0 q
(34)
Applying the forward Park transformation to (34) leads to the following input to the SVM routines, expressed in the stationary reference frame:
Vα cos(ωt ) V = V ⋅ sin (ωt ) β
( 35)
The left side of Figure 6 shows the produced reference versus the angle (-π to +π). On the right side, the typical pole voltages of the inverter are represented.
ωt
Vα
Vβ
Va0 Vb0 Vc0 ωt
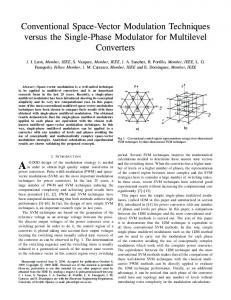
Figure 6: Reference vector (left) and inverter pole voltages (right) in continuous SVM The effects of the scaling in order to limit the reference vector within the hexagon are shown in the next figure. This time, the modulation index is set to full modulation, i.e. m=+1 (0x7FFF). Therefore, the (scaled) reference vector entirely follows the hexagon. ωt
Vα
Vβ
Va0 Vb0 Vc0 ωt
Figure 7: Reference vector (left) and inverter pole voltages (right) in full modulation
© Analog Devices Inc., January 2000
Page 22 of 22